
Amazon 101: Setting Up Your First ASIN
How to build your first Amazon listing

Introduction
Welcome to the first post in my Amazon 101 series. I am going to walk you through the the basics of how to get your business up and running on Amazon. Today I am going to guide you through the process of setting up a new listing, aka an ASIN.
What is an ASIN?
ASIN is an acronym that stands for “Amazon Standard Identification Number” and is Amazon’s internal unique identifier for a listing. An ASIN is attached to all listings on the platform1 and is used in a multitude of ways including product categorization, PPC product targeting, as an identifier for seller support tickets and more. Amazon will automatically assign you a an alpha-numeric ASIN so you will not need to think of one yourself, but after a few months of selling you will be able to recognize your products by the ASIN value alone.
Setting Up Your ASIN
Step 1: Adding a Product
The first step in adding a new product to Amazon is to login to your seller account and go to Catalog - Add Product. This will start the process of adding a new item to Amazon’s catalog and will lead you to an item submission form that will we will review over the coming sections.

Step 2: Add an Item not Sold on Amazon
In this step you will select the link “I’m Selling a Product Not Sold on Amazon”. If you were adding a pre-existing item to your seller account you would do that by searching for the product name, ASIN, UPC, EAN or GTIN value and then go through the steps outlined in the ‘Offer’ section below.

Step 3: Select a Product Category
In this step you will now select the the category2 for your product. As most of my readers are familiar with @BowtiedBull, we use his recommendation as our example and will be adding a diet supplement to the account.
The easiest way to identify the proper categorization for your listing is to search for a general term that describes your product. In this instance we searched for diet pills and our hypothetical diet pill will fall into the ‘fat burners’ category which is where the item will be categorized.

Step 4: Enter Your Product Attributes
The next step is to enter the product attributes. Below is a snapshot of the required fields and brief descriptions of the definitions for each attribute within the vital info and offer tabs.
Vital Info
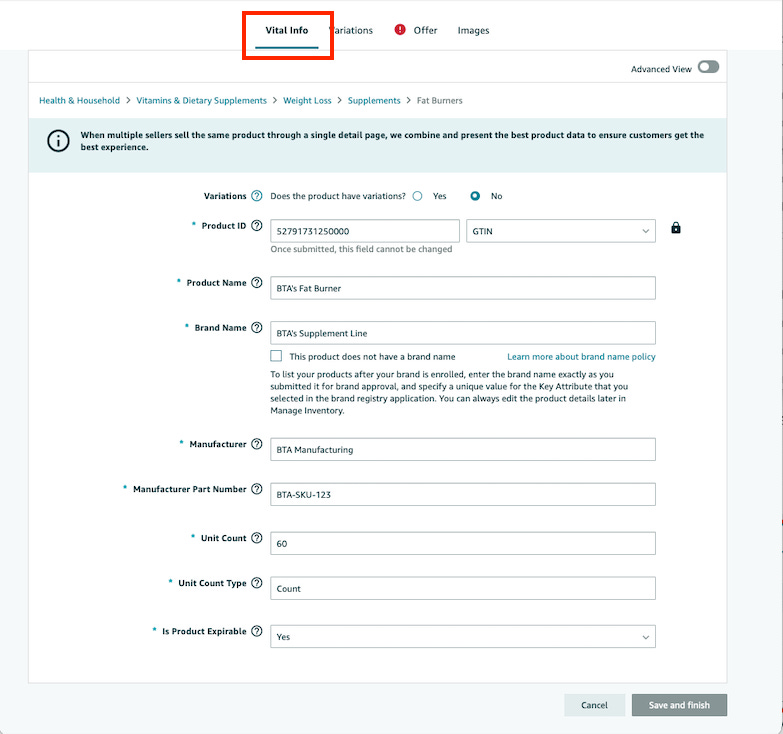
Variation: Variations refer to a group of items that are closely associated together which should be merchandised together. The classic example is a sweater which comes is multiple sizes and colors. Each color and size combination is a variant, our diet pill does not check this criteria and as such should not be categorized as a variation.
Product ID: Every item needs a barcode product identifier. Amazon gives you the option to choose between the following options: GTIN, EAN, UPC or ASIN. Since our item does not yet exist, we will not be able to use ASIN as a Product ID value.

Product Name: This is where you will enter your product title of 155 character or less. When putting together a title you should call out your brand name, accurately describe the product and fit in your target keywords for the listing.

Brand Name: You need to enter the name of the brand for this item. It is strongly advised that you go through the trademark process and ensure that the brand is truly yours. Amazon accepts proof of trademark registration from 20+ countries but I would recommend securing a registration from the US (able to be used on other marketplaces) or EU (fastest approvals). Note - the brand name field is case sensitive and once a brand name has been entered it cannot be altered in any manner.
Manufacturer: You can enter any value into this field, and the most common practice for sellers is to list your brand as the manufacturer. While this is most likely untrue (unless you are vertical integrated) it will prevent your competitors from identifying your supply chain partners.
Manufacturer Part Number: For most products, this will be identical to the model number (your internal SKU); however, some manufacturers distinguish part number from model3.
Unit Count: The cumulative count of the number of pills found in our bottle. In this instance we are selling a 60 count serving.
Unit Count Type: Unit Count Type refers to the type of measurement of your product. It can refer to the count of pills in a bottle, fluid ounces in a shake, ounces or pounds of protein powder, etc. For this example, we will be choose ‘count’ for our bottle of fat burning diet pills.

Is Product Expirable: Does your product expire or lose effectiveness over time? Select “Yes” if the product meets one of the following criteria: (1) has a printed expiration date, (2) is a topical or consumable product for either human or animal use, or (3) has a recommended shelf life. “For more information, refer to Expiry Seller policy and help page(s)4. Our answer to this is ‘yes’.

Offer Tab
The offer tab is where we will enter the specific details of the listing. Remember, any seller can create an offer on any listing so this will be your ‘slice’ of the AISN. For most private label sellers this is a non-issue as they control supply and distribution, but is critical to understand in a Retail Arbitrage business.

Seller SKU: Enter your internal stock keeping unit; in my experience I have always kept it the same as the manufacturer part number.
Your Price: Enter whatever price you want to charge customers for the item.
Quantity: Quantity refers to the number of units you have available to ship. Note that this example assumes that you are shipping the product directly to customers and are not enrolled in Fulfilled by Amazon (FBA).
Item Condition: There are certain restrictions for selling used versus new products. In most instances when doing private label your product will be new.
Fulfillment Channel: Are you shipping the product or will it be Fulfilled by Amazon? In this example, the seller is shipping directly to the customer.
Images Tab
This is the most straight forward aspect of the setting up a new listing. You have the option to load up to 9 images, but the minimum to move forward with creating your listing a 1600x1600 front facing image of the product on a white background.

Once you load your product image(s) you will the submit button at the bottom of the page and will have a listing show up in your inventory tab.
Step 5: Compliance, Description & Keywords
At this point in the process, your item can be found within your inventory tab and will be sitting in active status. You will need to add a few other key pieces of information before you item is able to be sold.
Compliance
The Compliance section is a series of question centered around learning if you product contains any batteries or chemicals. These obviously do not pertain to a diet pill, but are asked to ensure safe shipping practices and compliance with shipping regulations

Description
This section is where you will enter the product description and key product features, more commonly referred to as product bullets. The product description is found —
Key product features are the 5 bullets found on a product detail page and serve two main functions. You bullets need to tell a compelling story to a customer of why they should purchase your item. It should articulate the value proposition of your item and highlight the unique benefits that make you product stand out in a crowd.
Writing your bullets and product page copy for customers should always take priority, but the you should ensure that you are including your target keywords in your bullet points. Amazon’s search algorithm will read your on-page content and try match your listing to relevant searches so don’t forget to optimize for both humans and algorithms.

Keywords
Speaking of algorithms….The Keywords tab is the place for you to describe your product to Amazon’s search algorithm by using all of the relevant keywords that are NOT on your product page.
You should keep the search terms to non-branded and general category related terms. In our diet pill example, we would not want to include a brand name like ‘GNC’, but would want to include terms such as ‘thermogenic’, ‘metabolism’ and ‘keto’.
This should go without saying, but do not fill in this section blind. Do your keyword research before attempting to complete this section as losing in organic search will have a negative compounding effect on your business. You can use Amazon’s Brand Analytics → Search Terms section or a third party tool such as Jungle Scout or Helium 10 to validate that you are targeting the highest velocity and most searched keywords possible.
Once this has been completed, you will hit Save and Finish and your listing will be live and transaction on Amazon within ~15 minutes!

Conclusion - What Next?
Now that you have the tools to set up a new listing, the next step is to figure out how to full your orders and launch your new product. Not sure how to do that? Don’t worry - we have Amazon 101 posts on both topics coming out shortly.
Like what you read? Share with a friend.
Love what you read? Upgrade to paid.
Does not apply to some books / kindle content
Category is also referred to as ITK or Item Type Keyword Browse Node.
This is taken directly from Amazon Seller Central.
This is taken directly from Amazon Seller Central.
As someone who just got accepted to Seller's Central, this has helped a bunch in wrapping my head around using Amazon as a platform. After going through @BowTiedPlankton's substack I've pinned down a product that I'm private labeling/launching a brand for as my first go. Leaning towards using MCF through Amazon as my primary means of fulfillment (paired with Shopify). Are there additional drawbacks to consider with MCF as a primary fulfillment model? I'm guessing there's also a risk of Amazon taking down your listing as with any product, but think it's a better model to start on as you also have Amazon as a channel to sell through as well (instead of finding a separate 3PL - then adding an Amazon listing AFTER). Or, would you recommend someone stick to FBA first?